Installing a beer dispenser in your home typically takes between 1 to 3 hours, depending on the specific setup and your experience level. This process involves gathering tools, connecting the CO2 system, attaching the keg coupler and beer line, and performing an initial setup and test to ensure perfectly chilled draft beer.
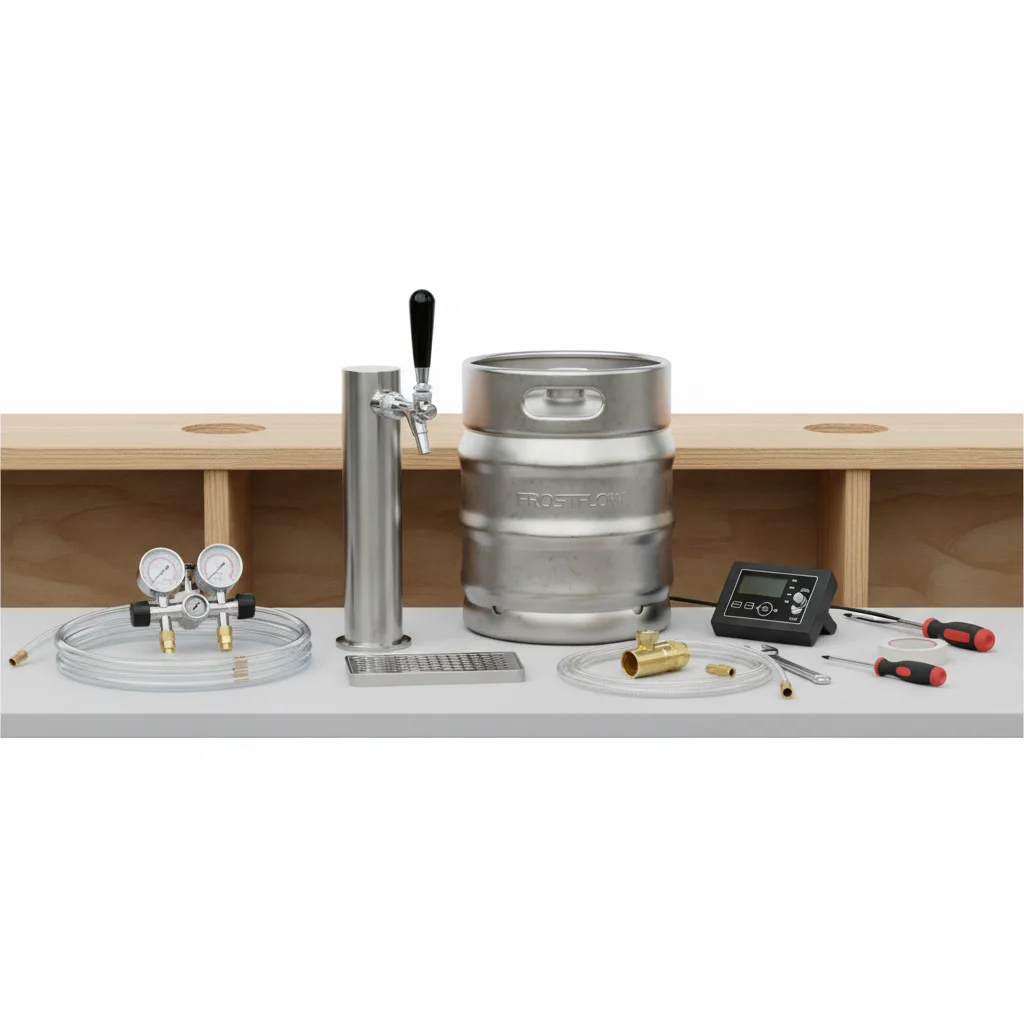
Gathering Your Tools and Components
Before starting, ensure you have all necessary tools and components. You will need a wrench, screwdriver, a CO2 tank, regulator, beer lines, air lines, a keg coupler, and the beer dispenser unit itself. Double-check that all connections and hoses are compatible with your specific model to prevent delays. For explore our home reviews on this site.
Connecting the CO2 System
The CO2 system is essential for dispensing beer. First, attach the CO2 regulator to the CO2 tank, ensuring a tight seal. Next, connect the air line from the regulator to the ‘gas in’ port on your keg coupler. Set the pressure on the regulator to the manufacturer’s recommended PSI, often around 10-12 PSI for most lagers and ales. Always check for leaks using a soapy water solution around connections.
Attaching the Keg Coupler and Beer Line
With the CO2 system ready, place the keg in the dispenser. Attach the keg coupler to the top of the keg by aligning the coupler lugs with the keg neck and twisting clockwise until it locks into place. Then, pull the tap handle down to engage the coupler. Connect the beer line from the coupler’s ‘beer out’ port to the shank on the dispenser tower. Ensure all connections are secure to prevent leaks and maintain proper pressure.
Initial Setup and Testing
|
Our Picks for the Best Beer Dispenser in 2026
As an Amazon Associate I earn from qualifying purchases.
|
||
| Num | Product | Action |
|---|---|---|
| 1 | 2pcs Beer Giraffe Dispenser, 100oz/3.2 qt Mimosa Tower Dispenser with Ice Tube and LED Light, 3L Tabletop Drink Tower Dispensers for Beer, Margarita, Liquor, Beverage |

|
| 2 | Beer Dispenser Margarita Tower, 50oz Mimosa Tower Dispenser with Ice Tube and LED Light, Tabletop Drink Tower Dispenser 1.6 qt for Beer, Margarita, Liquor, Beverage |
|
| 3 | Beer Dispenser, 100oz/3.2 qt Mimosa Tower Dispenser with Ice Tube and LED Light for Margarita, Liquor, Beverage - Tabletop Drink Tower Dispensers for Parties |
|
| 4 | BeerSquad Beer Tower - 3L 100 oz. Clear Beverage Tower Dispenser with Included Ice Tube, Easy Clean, Dual Action Integrated Tap |
|
| 5 | -Beverage Dispenser - Drink Dispensers for Parties -Perfect Home Bar Accessories - Alcohol, Beer & Liquor Dispenser - Mimosa Tower |
|
| 6 | Hammer + Axe Beverage Dispenser – 88 oz Party Drink Dispenser with Ice Tube & Tap| Drink Fountain for Beer, Water, Iced Tea| Mimosa Tower| Margarita Tower| BBQ & Tailgate Essential| Home Bar Accessory |
|
| 7 | Beer Tower 3L/100oz Beverage Dispenser with fluent Spigot & Ice Tube,Margarita Tower, Mimosa Tower, Tabletop Liquor Drink Dispenser for Parties, Bars, Pubs, Restaurants |
|
| 8 | Drink Tower, 3L Mimosa Tower Dispenser With Ice Tube and Led Light, Tabletop Beer Dispenser 3.17 Qt./101oz, Ideal for Parties Bars Pubs Restaurants |
|
| 9 | Hammer + Axe Beverage Dispenser – 88 oz Party Drink Dispenser with Ice Tube & Tap| Drink Fountain for Beer, Water, Iced Tea| Mimosa Tower| Margarita Tower| BBQ & Tailgate Essential| Home Bar Accessory |
|
| 10 | OGGI Beer Tower 88oz - Beverage Dispenser with Spigot & Ice Tube, Margarita Tower, Mimosa Tower, Perfect Drink Dispensers for Parties, Drink Tower, Holds 6 Pints of Beer – Stainless |
|
Once all lines are connected, open the CO2 tank valve. You should hear gas flowing into the keg. Allow the system to pressurize for about 15-30 minutes before attempting to pour. This allows the beer to chill and the CO2 to properly carbonate. For the first pour, you might get some foam, which is normal as the lines clear. Discard the first few ounces until a steady stream of beer appears.
- Verify all connections are tight and leak-free.
- Ensure the CO2 pressure is set correctly for your beer type.
- Allow adequate time for the beer to chill before serving.
- Clean the beer lines regularly to maintain taste and hygiene.
- Store CO2 tanks upright in a well-ventilated area.
Troubleshooting Common Installation Issues
If you encounter issues during installation, common problems include leaks, improper CO2 pressure, or a lack of beer flow. Check all connections for tightness and use a leak detector spray. Adjust the CO2 regulator if the pressure is too high or too low. If beer is not flowing, ensure the keg coupler is fully engaged and the CO2 tank is not empty. Consulting your dispenser’s manual can provide specific troubleshooting steps for your model.
Maintaining Your Newly Installed Dispenser
After successful installation, regular maintenance is key to enjoying fresh draft beer. This includes cleaning your beer lines every 2-3 weeks, checking CO2 levels, and ensuring the dispenser’s cooling unit is functioning optimally. Proper maintenance extends the life of your unit and guarantees the best possible beer quality.
Frequently Asked Questions
How long does it take to install a home beer dispenser?
Installing a home beer dispenser typically takes between 1 to 3 hours. The exact time depends on your experience level and the complexity of your specific setup, including the type of dispenser and kegerator components.
What tools and components are needed for beer dispenser installation?
For beer dispenser installation, you will need a wrench, screwdriver, a CO2 tank, regulator, beer lines, air lines, a keg coupler, and the beer dispenser unit itself. Always ensure all parts are compatible with your specific model before starting.
What is the recommended CO2 pressure for dispensing beer?
The recommended CO2 pressure for dispensing most lagers and ales is typically around 10-12 PSI. Always consult your beer dispenser's manufacturer recommendations and the specific beer type for optimal pressure settings.
How do you check for leaks in a newly installed beer dispenser system?
To check for leaks in a newly installed beer dispenser system, apply a soapy water solution around all connections, especially those involving the CO2 tank and regulator. If bubbles appear, there is a leak that needs to be tightened or sealed.
How often should beer lines be cleaned after installation?
Beer lines should be cleaned regularly, ideally every 2-3 weeks, after successful installation. This routine maintenance is crucial for maintaining the taste and hygiene of your draft beer and extending the life of your dispenser.
Install a Home Beer Dispenser
This guide provides step-by-step instructions for installing a beer dispenser in your home, ensuring you can enjoy perfectly chilled draft beer.
Collect all necessary tools such as a wrench and screwdriver, along with components like the CO2 tank, regulator, beer lines, air lines, keg coupler, and the dispenser unit. Verify compatibility of all parts with your specific model.
Attach the CO2 regulator to the CO2 tank, ensuring a tight seal. Connect the air line from the regulator to the 'gas in' port on the keg coupler. Set the pressure to 10-12 PSI and check for leaks with soapy water.
Place the keg in the dispenser and attach the keg coupler to the keg neck by twisting clockwise until it locks. Engage the coupler by pulling the tap handle down. Connect the beer line from the coupler's 'beer out' port to the dispenser tower shank, ensuring secure connections.
Open the CO2 tank valve and allow the system to pressurize for 15-30 minutes for chilling and carbonation. Discard the first few ounces of foam until a steady stream of beer appears, indicating proper flow and pressure.
Get our weekly buyer guide
Practical specs, not advice. Unsubscribe anytime.
I’ve always wanted a draft system at home but was intimidated by the setup. This guide made connecting the CO2 system so straightforward. I had my new kegerator up and running in about 2 hours, just like it said it would take. The step-by-step instructions for attaching the regulator and air line were super helpful.
This was a solid guide for getting my beer dispenser installed. I appreciated the reminder to double-check all connections and hoses for compatibility – that saved me a headache. My only minor quibble is that I wish there was a bit more detail on troubleshooting if the beer line wasn’t pouring correctly right away. Still, very useful overall.
The instructions for attaching the keg coupler were a bit vague for a first-timer like me. I had to re-read that section a few times to make sure I had it right. Everything else, especially the initial setup and test, was pretty clear and helped me get my system working. It’s pouring perfectly chilled draft beer now, but that one step could use more clarity.
Fantastic resource! I was able to gather all my tools and components easily thanks to the checklist provided. The whole process, from start to finish, was much less daunting than I expected. Now I’m enjoying fresh draft beer right from my kitchen. Highly recommend following these steps if you’re installing a new unit.