Setting the perfect CO2 pressure on a beer dispenser is crucial for pouring a flawless pint, with ideal settings typically ranging from 10-30 PSI depending on beer style and temperature. Incorrect pressure leads to issues like foamy or flat beer, impacting taste and presentation. This guide provides the knowledge and practical steps to achieve optimal CO2 pressure for consistent, high-quality draft beer.
Understanding CO2 Pressure in Beer Dispensing
Carbon dioxide (CO2) plays a critical dual role in dispensing draft beer: it maintains the beer’s carbonation level and provides the necessary force to push the beer from the keg through the lines and out of the faucet. As CO2 is a natural byproduct of fermentation, it is the ideal gas for this purpose. Using compressed air is strongly discouraged as oxygen can harm the beer’s flavor, aroma, and texture.
A full CO2 cylinder holds gas at pressures upwards of 800 PSI, far too high for dispensing. This is where the regulator comes in. The CO2 regulator is a crucial component that reduces the high pressure from the tank to a safe and controllable level, typically between 10-30 PSI for serving beer. This controlled pressure displaces the beer as it’s poured, filling the headspace in the keg and maintaining the desired carbonation throughout its lifespan. Proper regulation ensures consistent quality, preserving the taste, mouthfeel, and overall presentation that the brewer intended.
Factors Influencing Ideal CO2 Pressure
Achieving the perfect pour is not a one-size-fits-all endeavor; several variables affect the optimal CO2 pressure setting for your beer dispenser. Understanding these factors is key to troubleshooting and maintaining an excellent draft system.
Beer Style and Carbonation Volume
Different beer styles are brewed with varying levels of carbonation, measured in “volumes of CO2.” This carbonation level directly dictates the required CO2 pressure to keep the beer in equilibrium within the keg. For example, highly carbonated beers like wheat beers require more pressure than less carbonated stouts.
- British Ales, Porters, Stouts: Typically 1.5–2.0 volumes CO2, requiring 8–11 PSI.
- American Pale Ales, IPAs, Ambers, Lagers: Generally 2.2–2.6 volumes CO2, needing 10–14 PSI.
- German Pilsners and Continental Lagers: Often 2.4–2.7 volumes CO2, around 11–15 PSI.
- Wheat Beers and many Belgian Ales: Can range from 2.6–3.5 volumes CO2, requiring 14–20+ PSI.
- Stouts (Nitrogen-reliant): These often use a beer gas blend (CO2/Nitrogen) and a nitrogen regulator, typically set around 35–38 PSI.
Temperature
Temperature profoundly impacts CO2 solubility in beer. Colder beer retains dissolved CO2 more effectively than warmer beer. This means that if your beer is too warm, the CO2 will “break out” of the solution, leading to foamy pours and eventually flat beer in the keg. Conversely, if the beer is too cold for the applied pressure, it can become over-carbonated. Most draft systems aim for a beer temperature between 36°F and 38°F (2-3°C) for optimal carbonation maintenance. Consistency in temperature throughout the system, from keg to faucet, is crucial to prevent foaming issues.
Altitude
|
Our Picks for the Best Beer Dispenser in 2026
As an Amazon Associate I earn from qualifying purchases.
|
||
| Num | Product | Action |
|---|---|---|
| 1 | BeerSquad Beer Tower - 3L 100 oz. Clear Beverage Tower Dispenser with Included Ice Tube, Easy Clean, Dual Action Integrated Tap |

|
| 2 | -Beverage Dispenser - Drink Dispensers for Parties -Perfect Home Bar Accessories - Alcohol, Beer & Liquor Dispenser - Mimosa Tower |
|
| 3 | Hammer + Axe Beverage Dispenser – 88 oz Party Drink Dispenser with Ice Tube & Tap| Drink Fountain for Beer, Water, Iced Tea| Mimosa Tower| Margarita Tower| BBQ & Tailgate Essential| Home Bar Accessory |
|
| 4 | 2pcs Beer Giraffe Dispenser, 100oz/3.2 qt Mimosa Tower Dispenser with Ice Tube and LED Light, 3L Tabletop Drink Tower Dispensers for Beer, Margarita, Liquor, Beverage |
|
| 5 | Beer Tower 3L/100oz Beverage Dispenser with fluent Spigot & Ice Tube,Margarita Tower, Mimosa Tower, Tabletop Liquor Drink Dispenser for Parties, Bars, Pubs, Restaurants |
|
| 6 | Beer Dispenser, 100oz/3.2 qt Mimosa Tower Dispenser with Ice Tube and LED Light for Margarita, Liquor, Beverage - Tabletop Drink Tower Dispensers for Parties |
|
| 7 | Beer Dispenser Margarita Tower, 50oz Mimosa Tower Dispenser with Ice Tube and LED Light, Tabletop Drink Tower Dispenser 1.6 qt for Beer, Margarita, Liquor, Beverage |
|
| 8 | OGGI Beer Tower 88oz - Beverage Dispenser with Spigot & Ice Tube, Margarita Tower, Mimosa Tower, Perfect Drink Dispensers for Parties, Drink Tower, Holds 6 Pints of Beer – Stainless |
|
| 9 | Hammer + Axe Beverage Dispenser – 88 oz Party Drink Dispenser with Ice Tube & Tap| Drink Fountain for Beer, Water, Iced Tea| Mimosa Tower| Margarita Tower| BBQ & Tailgate Essential| Home Bar Accessory |
|
| 10 | Drink Tower, 3L Mimosa Tower Dispenser With Ice Tube and Led Light, Tabletop Beer Dispenser 3.17 Qt./101oz, Ideal for Parties Bars Pubs Restaurants |
|
While often overlooked, altitude also influences the required CO2 pressure. Atmospheric pressure decreases at higher altitudes, which means you’ll need slightly more applied CO2 pressure to maintain the same carbonation level in your beer compared to sea level. This is because carbonation is proportional to absolute pressure, not just gauge pressure. For precise adjustments at elevated locations, a carbonation chart accounting for altitude may be necessary.
Beer Line Length and Diameter
The length and internal diameter of your beer lines create resistance, which is essential for a balanced draft system. This resistance helps control the flow rate and prevents beer from pouring too quickly or too slowly. For kegerators and direct-draw systems, standard beer line lengths are usually sufficient. However, for long-draw systems where beer travels 15 feet or more, a specific formula considering line length, line resistance, and gravity is often used to calculate the ideal pressure. Trying to compensate for an unbalanced system by adjusting CO2 pressure alone can lead to over or under-carbonated beer.
How to Set Your Beer Dispenser’s CO2 Pressure
Setting the correct CO2 pressure is a straightforward process once you understand the basic steps and the equipment involved.
Essential Equipment
To set your CO2 pressure, you’ll need a few key components:
- CO2 Tank: Contains the compressed carbon dioxide.
- CO2 Regulator: Connects to the CO2 tank and features one or two gauges. One gauge displays the pressure in the tank, and the other (the output gauge) shows the pressure being supplied to the keg (PSI).
- Keg Coupler: Connects the CO2 line and beer line to the keg.
- Beer Lines and Faucet: Transport the beer from the keg to your glass.
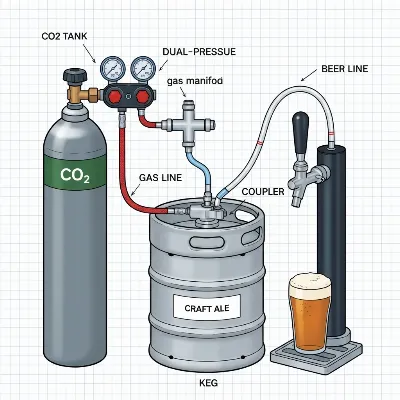 Diagram of a Beer Dispenser CO2 Regulator with Labels
Step-by-Step Adjustment Guide
Follow these steps to safely and accurately adjust the CO2 pressure on your beer dispenser:
- Turn off the Shutoff Valve: Locate the shutoff valve at the bottom of your CO2 regulator and turn it to the “OFF” position. This stops the gas flow to the keg.
- Release Existing Pressure (Optional but Recommended): If your system is already under pressure, it’s a good idea to bleed off any excess pressure from the keg. You can usually do this by pulling the pressure relief valve on your keg coupler for a few seconds.
- Adjust the Regulator Adjusting Screw: Turn the regulator adjusting screw (usually a knob or screw on the front or side of the regulator) counter-clockwise until it turns freely. This completely backs off the pressure setting.
- Open the CO2 Cylinder: Slowly open the hand valve on your main CO2 cylinder by turning it counter-clockwise until it is fully open. You should see the tank pressure gauge (if your regulator has one) register the full pressure of the tank.
- Set the Desired Pressure: Slowly turn the regulator adjusting screw clockwise. Watch the output pressure gauge (the one showing PSI to the keg) as you turn it. Stop when the gauge reaches your desired pressure setting for the beer you are dispensing.
- Tighten the Stop Nut (if applicable): Some regulators have a stop nut on the adjusting screw. If yours does, tighten it to lock the pressure setting in place and prevent accidental changes.
- Turn on the Shutoff Valve: Turn the shutoff valve at the bottom of the regulator back to the “ON” position. The CO2 will now flow to the keg at your set pressure.
- Wait for Equilibrium: Allow the system to equalize for a few hours, or even overnight, especially if you’ve made significant changes. The beer needs time to absorb or release CO2 to reach equilibrium at the new pressure.
Initial Pressure Settings by Beer Style
While the ideal pressure can vary slightly based on your specific system and beer, this table provides a great starting point for common beer styles. Always consider your beer’s temperature when making adjustments.
| Beer Style | Recommended CO2 Pressure (PSI) | Notes |
|---|---|---|
| American Ales (Pale Ale, IPA) | 10 – 13 | Most common range for a balanced system. |
| Lagers (American, European) | 10 – 14 | Slightly higher carbonation than many ales. |
| Light Pilsners | 11 – 16 | Often require slightly higher carbonation. |
| Wheat Beers, Belgian Ales | 15 – 20 | Typically highly carbonated styles. |
| Stouts, Porters | 8 – 11 | Lower carbonation. For nitrogen stouts, use 35-38 PSI with beer gas. |
| Strong Ales, Barleywines | 8 – 12 | Lower carbonation for a smoother mouthfeel. |
Troubleshooting Common CO2 Pressure Issues
Even with careful setup, issues can arise. Knowing how to diagnose and fix common CO2-related problems will save you frustration and ensure you continue to enjoy quality draft beer.
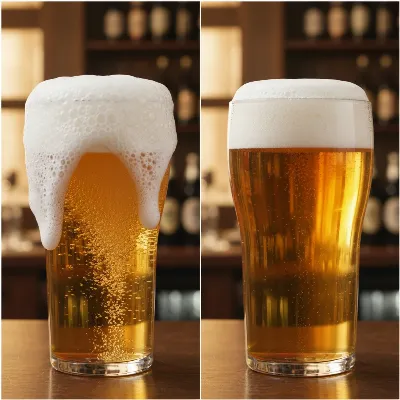 Comparison of Foamy Beer vs. Perfect Beer Pour
Foamy Beer (Over-Carbonation)
Excessive foam and a lack of liquid beer in your glass are tell-tale signs of over-carbonation, or sometimes, temperature issues. The foam will appear tight with large bubbles that rush uncontrollably to the top of the beer.
- Causes: Too much CO2 pressure, beer temperature is too high, dirty beer lines, or a beer line that is too short for your system.
- Solutions:
- Lower CO2 Pressure: Reduce the regulator setting by 1-2 PSI, bleed off excess pressure from the keg, and pour a few foamy glasses to clear the over-carbonated beer in the line. Wait for the system to re-balance.
- Check Temperature: Ensure your kegerator or cooling system maintains the beer at 36-38°F. Warmer beer releases CO2 faster, causing foam.
- Clean Lines: Regularly clean your beer lines to remove yeast buildup and other residues that can cause foaming.
- Inspect Line Length: If your beer line is too short, there isn’t enough resistance to slow the beer flow, leading to foam. Consult a guide on appropriate beer line lengths.
Flat Beer (Under-Carbonation)
Flat beer lacks its characteristic fizziness and zest, tasting dull and watery. The foam, if any, will be loose and quickly dissipate, with no bubbles moving within the beer.
- Causes: CO2 pressure is too low, a leak in the system, or an empty CO2 cylinder.
- Solutions:
- Increase CO2 Pressure: Slowly increase the regulator pressure by 1-2 PSI, ensuring it aligns with the recommended setting for your beer style and temperature. Allow time for the beer to re-carbonate.
- Check for Leaks: Inspect all connections, from the CO2 tank to the coupler, for any leaks. Use a soapy water solution; bubbles will indicate a leak.
- Check CO2 Tank: Ensure your CO2 tank isn’t empty. Replace or refill as needed.
- Verify Temperature: While less common for flat beer, incorrect temperature can exacerbate under-carbonation if the beer is too warm and losing CO2.
Slow Pour
A trickle of beer or a noticeably slow pour can be frustrating and often points to a pressure issue or obstruction.
- Causes: CO2 pressure is too low, a kinked or obstructed beer line, or a partially blocked faucet.
- Solutions:
- Check/Increase CO2 Pressure: Confirm your regulator is set to the correct pressure for your beer style. If it’s too low, increase it gradually.
- Inspect Beer Lines: Check for any kinks, twists, or blockages in the beer lines that might restrict flow.
- Clean Faucet: Disassemble and thoroughly clean your faucet to remove any buildup that could be impeding the flow.
Conclusion
Setting the perfect CO2 pressure on your beer dispenser is fundamental to enjoying fresh, perfectly carbonated draft beer. By understanding the influence of beer style, temperature, and line dynamics, and by mastering the art of regulator adjustment, you can ensure consistent, high-quality pours every time. Regular monitoring and proactive troubleshooting of your system’s pressure settings will not only enhance your beer-drinking experience but also extend the life of your equipment.
Frequently Asked Questions
How long does it take for beer to carbonate after adjusting CO2 pressure?
After adjusting CO2 pressure, it typically takes several hours to a full day for the beer in the keg to reach equilibrium with the new pressure setting. For significant changes, or if the beer was severely under-carbonated, it might take 24-48 hours. Patience is key to allowing the CO2 to properly dissolve into the beer.
Can I use compressed air instead of CO2 for my beer dispenser?
No, it is highly recommended not to use compressed air to dispense beer. Compressed air contains oxygen, which will quickly oxidize and spoil the beer, leading to off-flavors and a stale taste. CO2 is the standard and correct gas to use for maintaining carbonation and pushing beer from a keg.
What is the ideal temperature for serving draft beer?
The ideal temperature for serving most draft beer styles is between 36°F and 38°F (2-3°C). Maintaining this temperature range ensures optimal carbonation retention and prevents issues like excessive foaming or flat beer.
How do I know if my CO2 tank is empty?
You can determine if your CO2 tank is empty by checking the high-pressure gauge on your CO2 regulator. If the gauge reads near zero PSI, or if you notice a significant drop in pressure, the tank is likely empty and needs to be refilled or replaced.
Why is my beer pouring too slowly?
Slow beer pours are often caused by CO2 pressure that is too low, a kinked or obstructed beer line, or a partially blocked faucet. Check your regulator setting, inspect your lines for blockages, and clean your faucet to resolve the issue.
Frequently Asked Questions
How long does it take for beer to carbonate after adjusting CO2 pressure?
After adjusting CO2 pressure, it typically takes several hours to a full day for the beer in the keg to reach equilibrium with the new pressure setting. For significant changes, or if the beer was severely under-carbonated, it might take 24-48 hours. Patience is key to allowing the CO2 to properly dissolve into the beer.
Can I use compressed air instead of CO2 for my beer dispenser?
No, it is highly recommended not to use compressed air to dispense beer. Compressed air contains oxygen, which will quickly oxidize and spoil the beer, leading to off-flavors and a stale taste. CO2 is the standard and correct gas to use for maintaining carbonation and pushing beer from a keg.
What is the ideal temperature for serving draft beer?
The ideal temperature for serving most draft beer styles is between 36u00b0F and 38u00b0F (2-3u00b0C). Maintaining this temperature range ensures optimal carbonation retention and prevents issues like excessive foaming or flat beer.
How do I know if my CO2 tank is empty?
You can determine if your CO2 tank is empty by checking the high-pressure gauge on your CO2 regulator. If the gauge reads near zero PSI, or if you notice a significant drop in pressure, the tank is likely empty and needs to be refilled or replaced.
Why is my beer pouring too slowly?
Slow beer pours are often caused by CO2 pressure that is too low, a kinked or obstructed beer line, or a partially blocked faucet. Check your regulator setting, inspect your lines for blockages, and clean your faucet to resolve the issue.
Get our weekly buyer guide
Practical specs, not advice. Unsubscribe anytime.
I’ve been trying to get my stout to pour correctly, and the advice on maintaining carbonation levels with CO2 was useful. However, I found the section on troubleshooting specific issues like a slow pour a bit brief. It helped me understand the basics, but I still had to do some extra digging to fine-tune my setup for that perfect creamy head.
This was super helpful for understanding why my beer was coming out flat sometimes. I learned that using compressed air is a no-go, which I honestly didn’t realize was such a big deal for flavor. My only minor complaint is that I wish there was a quick reference chart for common beer styles and their ideal PSI, but overall, it’s a solid resource.
I used to struggle with overly foamy pours, and I couldn’t figure out why. Following the steps for setting CO2 pressure, especially paying attention to the 10-30 PSI range for different beer styles, made a huge difference. My home bar now serves perfect pints every time. This guide really helped me dial in my system.
Finally, a clear explanation of how CO2 works in my kegerator! I always knew it pushed the beer, but understanding its role in maintaining carbonation was an eye-opener. My lagers are tasting much crisper now that I’m more precise with my pressure settings. No more guessing games with my pours.